Creating a WordPress website can seem daunting, especially for beginners. In this guide, we’ll walk you through the process step-by-step, from selecting a hosting plan to securing your site with Vulnscanner AI. By the end of this post, you’ll have a fully functional and secure WordPress website.
Table of Contents
- Step 1: Choose the Right Hosting Plan
- Step 2: Choose Your Domain Name
- Step 3: Install WordPress
- Step 4: Access Your WordPress Dashboard
- Step 5: Choose a Theme
- Step 6: Secure Your Website with VulnScanner.ai
- Conclusion
Step 1: Choose the Right Hosting Plan
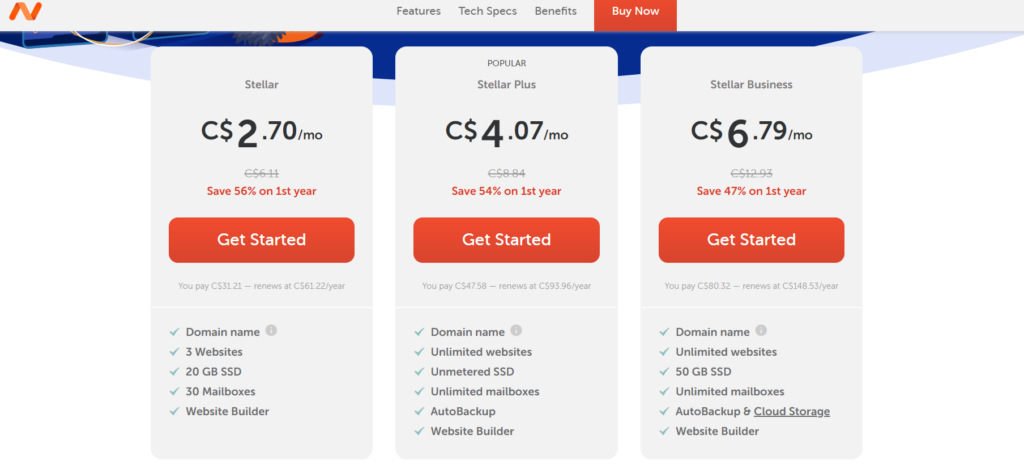
The first step is to select a hosting plan. We recommend the “Stellar” shared hosting plan from Namecheap for its affordability and reliability. Here’s how to do it:
- Go to the Namecheap website and navigate to the “Hosting” section.
- Select “Shared Hosting” and choose the “Stellar” plan.
- Click “Get Started” and proceed to the checkout.
Step 2: Choose Your Domain Name
After selecting your hosting plan, you’ll need to choose a domain name. Your domain is your website’s address on the internet.
- On the domain selection page, enter your desired domain name and check its availability.
- If your chosen name is available, add it to your cart. If not, try different variations until you find one that’s available.
- Complete the domain registration process and proceed to the checkout.
Step 3: Install WordPress
With your hosting plan and domain name ready, it’s time to install WordPress.
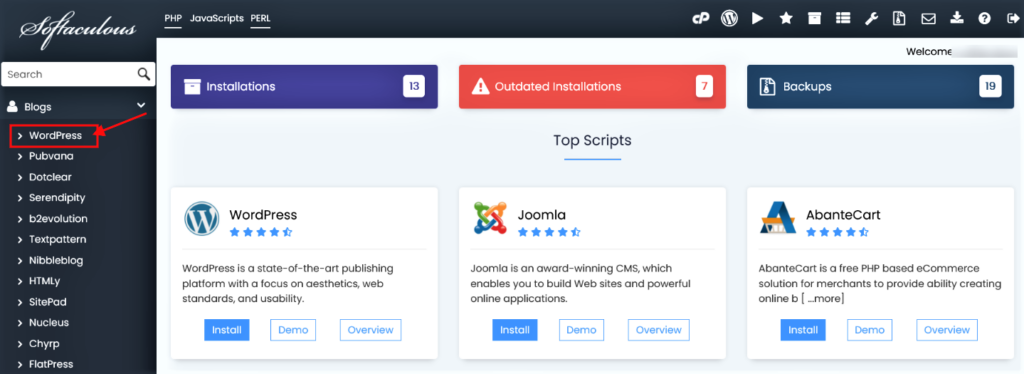
- Log in to your Namecheap account and go to your cPanel.
- In the cPanel dashboard, find the “Softaculous Apps Installer” and click on it.
- Select WordPress from the list of available applications and click “Install.”
- Fill in the required details, such as your site name, description, and admin login information, then click “Install” again.
Step 4: Access Your WordPress Dashboard
Once WordPress is installed, you can access your dashboard.
- Go to your domain followed by “/wp-admin” (e.g., yourdomain.com/wp-admin).
- Log in using the admin credentials you set up during the WordPress installation.
Step 5: Choose a Theme
With your WordPress dashboard open, the next step is to choose a theme.
- In the WordPress dashboard, navigate to “Appearance” > “Themes.”
- Click “Add New” to browse the available themes.
- Preview themes and select one that suits your website’s style and purpose.
- Click “Install” and then “Activate” to apply the theme to your site.
Step 6: Secure Your Website with Vulnscanner AI
Security is crucial for any website. All websites are vulnerable to attacks, and failing to secure them can lead to being hacked. Today we will secure your site using Vulnscanner AI for free!
- Register for a free account on Vulnscanner AI.
- Connect your website to the platform by following the easy setup instructions.
- Activate the autoscan function to have your website scanned regularly.
- Receive weekly security reports with AI-assisted guidance on how to fix vulnerabilities.
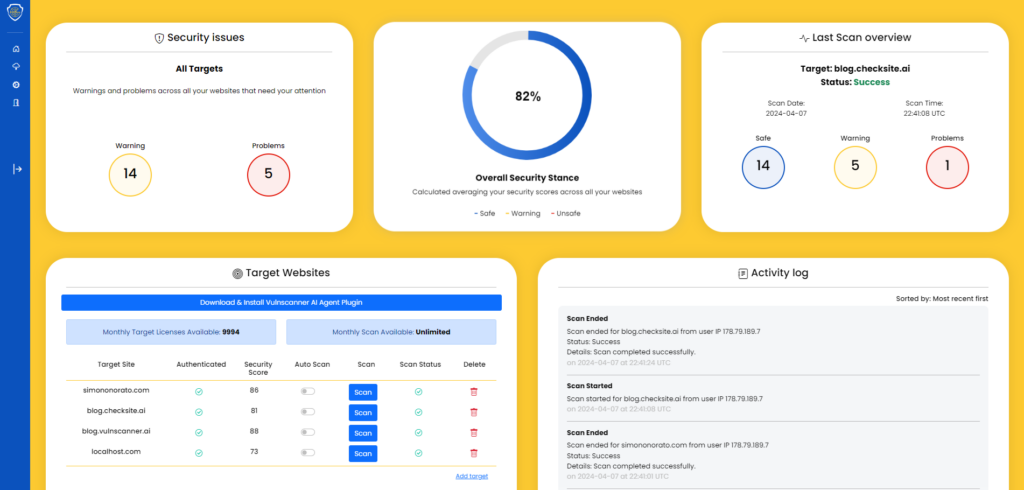
By keeping your site secure with regular scans and updates, you can prevent potential security breaches and ensure a safe experience for your visitors.
Conclusion
Congratulations! You’ve successfully created a WordPress website on Namecheap with the shared hosting plan and secured it with VulnScanner.ai. Remember, maintaining the security of your website is an ongoing process, so make sure to follow the recommendations from your weekly security reports.